GKE/K8s Scaling
Notes I took whilst studying the badly named "Optimize Costs for Google Kubernetes Engine" and "Implement Load Balancing on Compute Engine" courses as part of the Google Hybrid and Multi-Cloud Architect Learning Path
Covers autoscaling, load balancers, resource quotas, limit ranges, disruption budgets etc.

GKE and K8 Costs
Best practices:
-
How many development clusters do you need or have - use namespaces and policies to keep things isolated and capped
-
Disable horizontal pod autoscaling in dev as well as kube-dns+kube-dns scaling and cloud monitoring.
Pod Disruption Budget
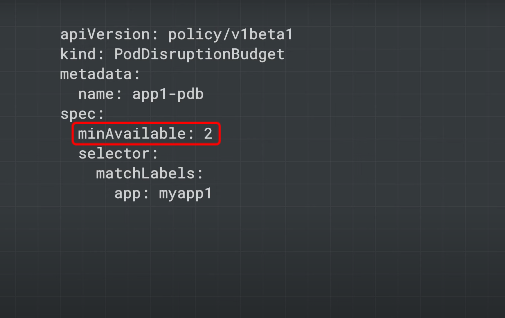
What is the minimum number of pods you need to keep running to ensure your app functions?
Monitoring your GKE Costs
You can use the monitoring dashboard. You need to understand what resources your app actually needs.
Cloud Operations -> Monitoring (the cluster has a dashboard). Groupings by infrastructure, workload and service:
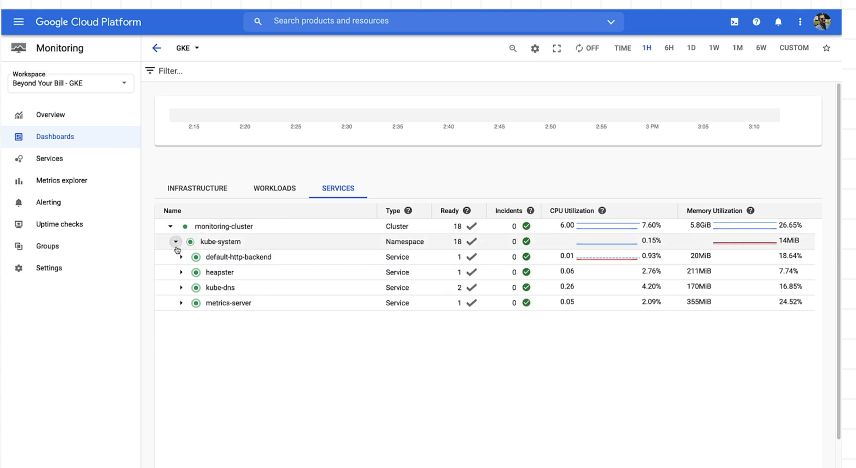
Metric explorer - for metrics and custom metrics.
The more your apps log, the more you'll pay - same for custom external metrics.
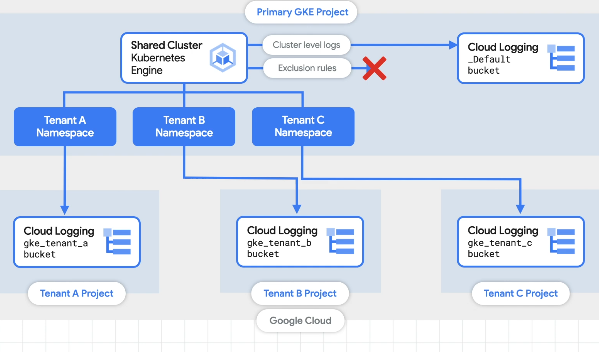
GKE Multi-tenant cluster logging
Send the logs back to tenants with exclusion rules to filter out un-needed logs.
GKE Usage monitoring
Auto collect metrics and export to BigQuery - compare actual usage to allocated usage.
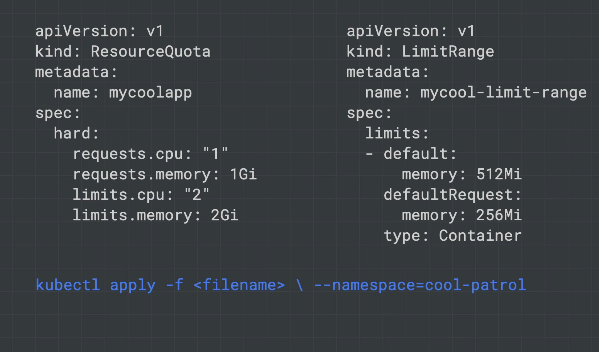
Resource Quotas
Cap resources at the namespace level.
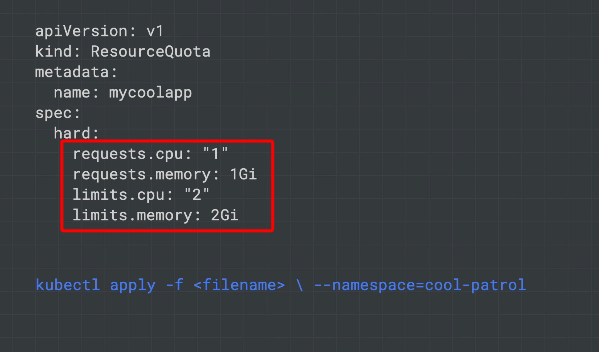
Stop any single tenant consuming so many resources that they end up triggering autoscaling.
Limit Ranges
Cap resources at the pod and cluster level.
Metrics Server
K8s metrics server exposes metrics via an API. Used to determine when to autoscale. Is a deployment, so as the cluster gets bigger the metrics server must also scale. On cluster growth the metrics server may also need to be scaled - it restarts when this occurs and causes small delays in autoscaling.
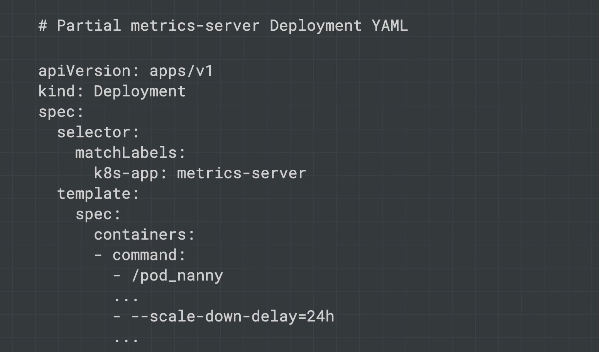
scale-down-delay to prevent scaling down too frequently.
Anthos Policy Controller
Check, audit and enforce policies you create like security, regulations, business metrics. KPT to build this into CI/CD, so config gets validated through the development cycle.
Virtual Machines
VMs make up a fundamental cost.
N series - general workloads.
E series - cheaper than N series, similar perf to N series.
Compute and memory optimised - for workloads that need more CPU or memory. Stack your workload onto fewer optimised VMs rather than many general VMs.
You can also shape your machines for the apps - custom levels of CPU and memory.
Bin Packing
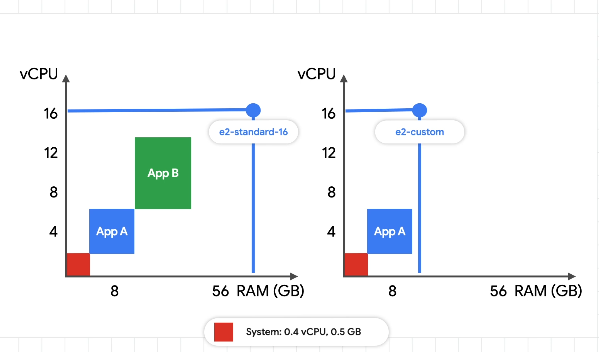
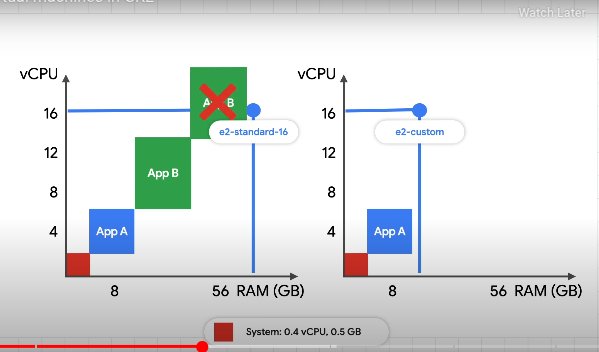
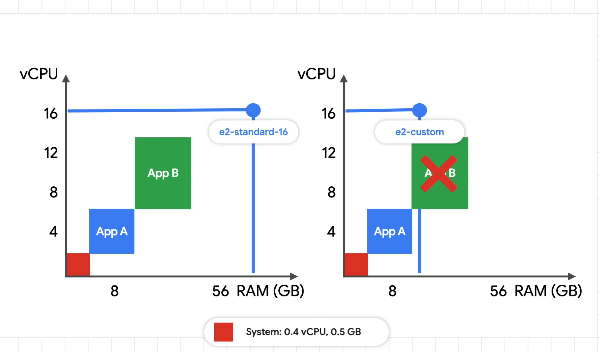
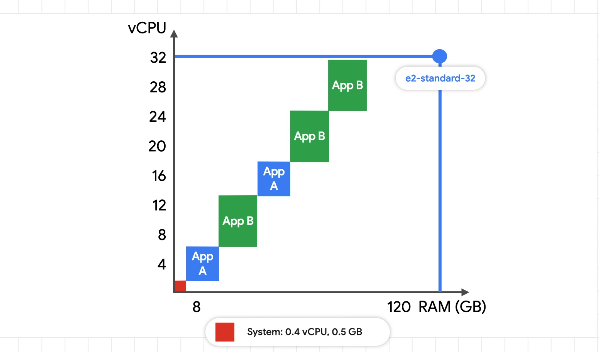
Risk putting all pods on the same node?
Larger machines for better binpacking. Hold all pods on the same machine for cost savings.
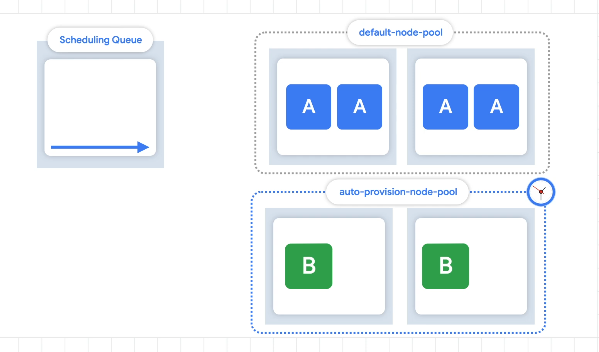
Node autoprovisioning
Determining the optimal machine sizes and creation of relevant node pools.
Pre-emptible VMs
Specify whether you want the VM to be pre-emptible. Cost up to 80% less.
Max instance duration of 24 hours. Can be removed at short notice. Apps need to be fault tolerant to one or many machine losses. How do your apps handle state, unavailability and ungraceful termination.
You could use a base nodepool of non-premptibles so you always have enough machines to cover baseline usage, and have a nodepool of pre-emptibles - you have a backup nodepool without pre-emptibles for safety.
Committed Use Discounts
Discounts on paying for x resources on a committed basis. Take some resources as committed to make your baseline cheaper:
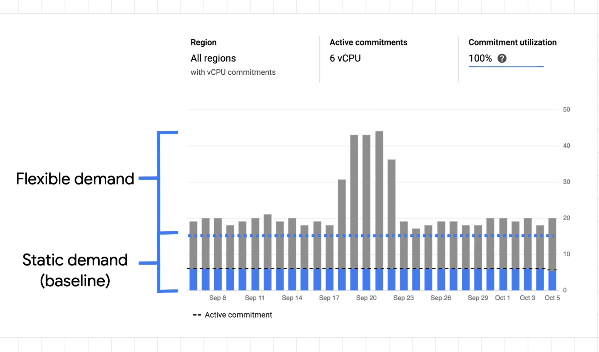
Regions also play a part in your VM costs - moving data between regions also costs. Use inter pod affinity and anti-affinity for more flexibility.
Autoscaling
Scaling resources as a function of demand.
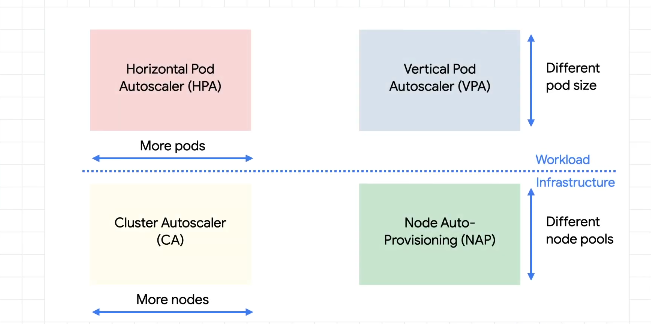
We distinguish between workloads (pods) and infrastructure (nodes):
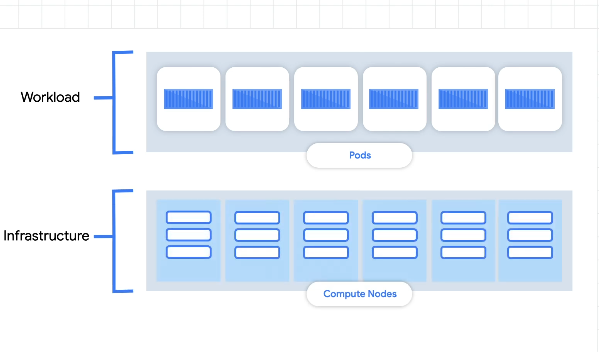
For either of these two, there are 2 ways to scale - horizontal and vertical.
-
Horizontal - add more pods or nodes
-
Vertical - increase the size of the node or the pod
Pod Autoscaling
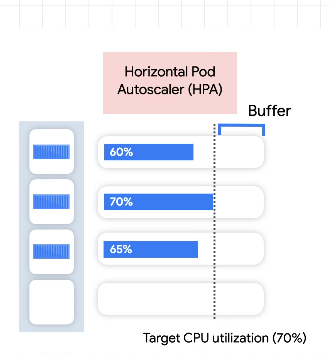
For horizontal we use a metric for demand like CPU, reqs/sec. Add pods to get the metric back to the desired state. Can also remove pods.
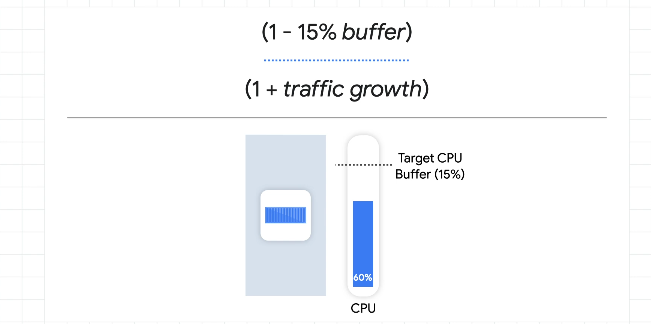
Lag based on cold start time. Need a buffer to cover the capacity needed for a spike in the metric:
- Min startup and shutdown time
- Accurate ready and live states
- Monitor the metrics server
For vertical pod autoscaling, the pod gets recreated with more resources.
- Off - no autoscaling, just watching pods and providing recommendations.
- Initial - use recommendations to create resized pods as needed, only once, not scaling up and down continuously.
- Auto - regularly resize pods by delting and re-creating.
Verticle scaling takes longer. Need to make sure the app can utilize more resources. Set limits and keep your metric server healthy.
Node auto-provisioning - auto create new nodes with different sizes as needed.
Set a pod disruption budget to prevent too many restarts.
Don't use both the horz and vert pod autoscaling on the same metric otherwise they'll interfere with one another:
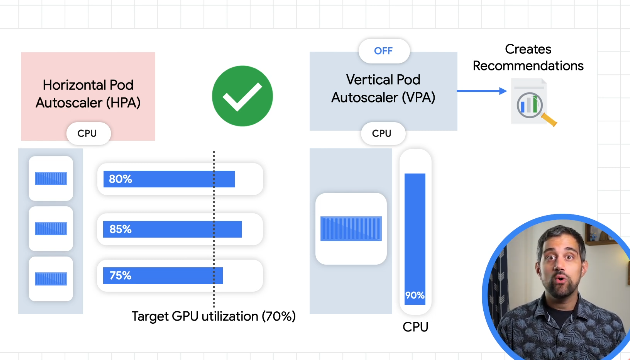
Vertical autoscaler requires a decent dataset to make recommendations.
Node/Infra Autoscaling
Change the number of nodes, or new nodepools with optimisations for size.
Cluster autoscaler - adds or removes nodes. Demand is based on pod scheduling and requests - if a pod can't be scheduled, that's when the cluster autoscaler kicks in and creates a new node.
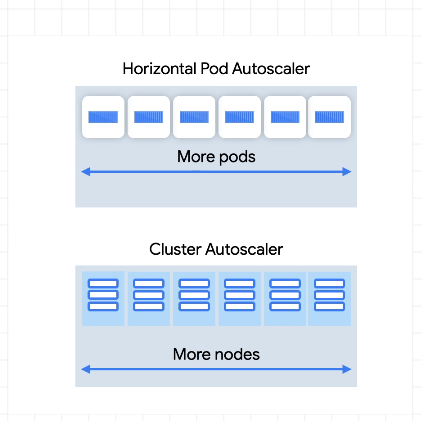
Tries to make cheaper nodes before more expensive ones.
Works with the constraints of the PodDisruptionBudget.
Some pods like kube-dns and those that use local storage can't be disrupted/restarted so block the autoscaler from removing a node. You can set system pod disruption budgets for system pods:
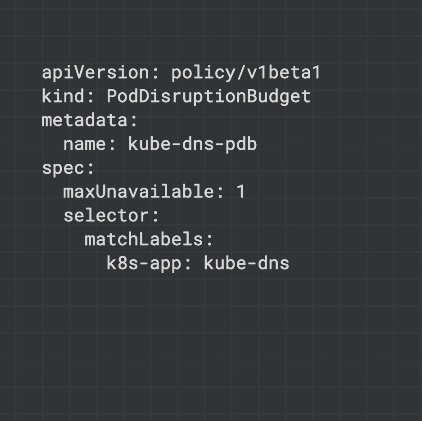
Some system pods only have one replica like the metrics server.
safe-to-evict - for pods with local storage, tell the autoscaler it's safe to restart
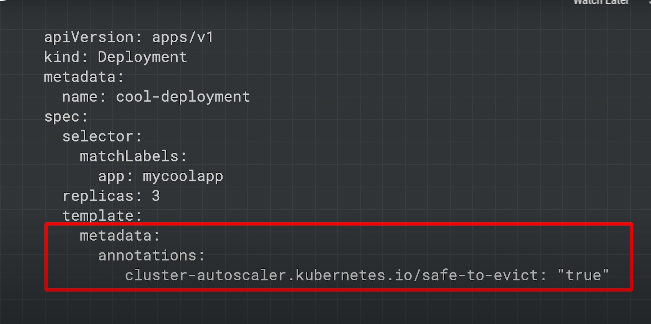
Node auto provisioning
Add new nodepools, sized for demand. Without this, new nodes are only created in nodepools you've already specified. Takes more time to create an optimised nodepool than just adding a node to an existing nodepool. Consider setting your horizontal pod autoscaler to scale more aggressively (sooner) on the number of pods.
pre-emptible tolerant - set metadata so the autoscaler/autoprovisioner knows that pods are tolerant to pre-emption and so can be used on pre-emptible VMs.
You can over-provision as this gives you a better buffer during spikes, gives times for the autoscaler to kick in and pods to come up:
Pause pods
Lower priority deployments which can be removed and replaced by higher priority - they do nothing, but just reserve buffer/resources for the higher priority pods. Scaling ahead of when you need too. One pause pod per node.
Application Optimization for GKE
-
Run app as a single pod replica without autoscaling. Use this to control resource requests and limits.
-
Retest with autoscaling (horz or vert) and rapid/spiky demand.
resourceRequests - how many resources your app needs to run
resourceLimit - the max resources the app is allowed to use
Set mem limit to equal mem request, but keep the cpu requests below the cpu limit.
Memory requires pod shutdown to downscale the memory allocation.
Vertical autoscaling only works if your app can use the additional node resources.
Horizontal autoscaling only works if your app/system can handle more demand by adding more pods. If the blocker is a database, more pods could make it worse.
Building Containers
Minimise startup times. NOdes have to download the base image for each app. Use the smallest baseimage your app needs.
Minimize startup time between startup and ready - prevent request failures whilst app is spinning up.
Startup and Shutdown
Make sure the app can shutdown gracefully. When a pod is going to be shutdown, it should get a SIGTERM. When this happens, you need to update the readiness probe to fail - requests stop coming in if you're using container native LB.
The pod must finish active requests and any new ones coming in - this is because k8s may still be sending you requests whilst you're shutting down, as it takes time for k8s to update where requests should be going post SIGTERM.
Pods should run cleanup e.g. persistence. Use preStop hook for graceful shutdown.
terminationGracePeriodSeconds - default of 30 seconds which gives the pod some time to shutdown before cluster autoscaler forcibly shuts down the pod.
k8s tries to obey pod disruption budgets whilst autoscaling to ensure there are enough replicas for the app to run correctly.
Readiness and Liveness Probes
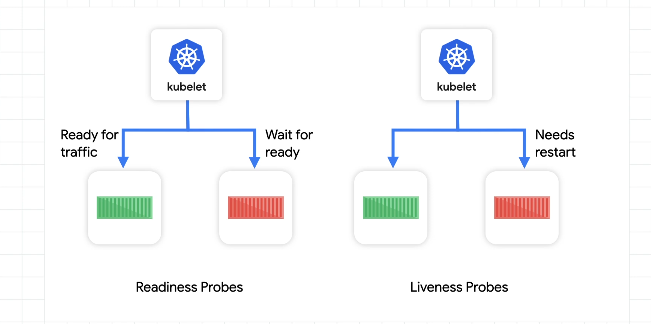
-
readiness - app is ready
-
liveness - if the pod is alive and working
Define readiness probes for each container. The readiness probe should only return true when fully ready e.g. if you need to load data from a cache, the probe should only return true after the data from the cache has been fully loaded.
If no startup time, return HTTP 200.
Should be a simple and quick check.
Retries
Exponential backoff on retries - custom, libs or service mesh (proxy level retry).
Rate limit requests as the service to enforce exponential backoff for the same caller. Make sure you can handle retry requests (idempotent).
Optimizing GKE for your Application
Batch
Not time sensitive, less concerned about startup times. Monthly cacls, data transformation. Node auto provisioning is useful and works well with batch workloads. Creates a new nodepool based on profiling.
Autoscaling is faster when it doesnt need to also restart the pods. Using dedicated nodepools for applications via labels/selectors/taints+tolerations helps quicker scaling and less wasted resources.
optimize-utilization - an autoscaler profile that tries to maximise utilization over keeping spare resources. Scales down quicker.
Separate different applications using node autoprovisioning - the nodepools generated are then sized according to the application.
Serving apps
Need to scale rapidly with spikes in demand e.g. retail websites on holidays
Quicker pods are to startup, the better the autoscaler can handle scaling up with demand.
If you have a longer provisioning time, can use pause pods (overprovisioning).
Use node local dns caching - store a node level DNS cache.
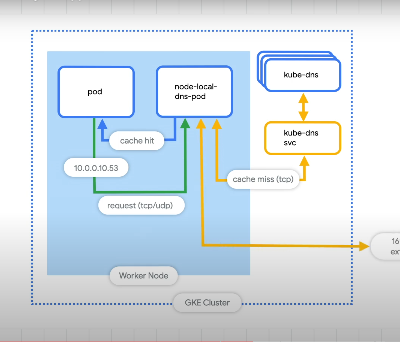
The kube-dns can take time to autoscale.
Minimise roundtrips with container native load balancing:
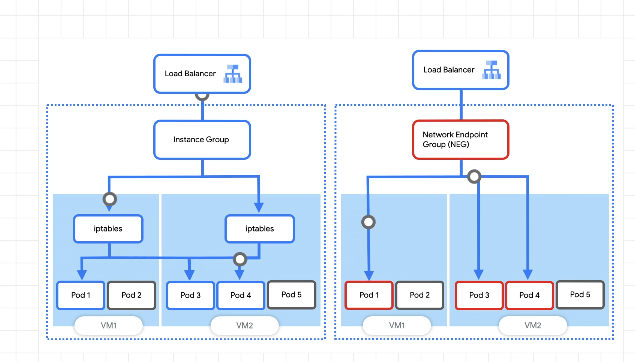
Rather than going from instance groups to pods, we can use a network endpoint group to go directly to the pods.
Ingress handles creating an L7 LB along with forwarding rules, firewalls etc.
If you use container native LB then you need to down your readiness probe as soon as you get the SIGTERM - so the lb knows to stop sending requests to the app.
Container native load balancing also allows you to use tools like traffic director.
Lab Notes
Zone export and set, get cluster creds
export ZONE=us-east1-d
gcloud config set compute/zone ${ZONE} && gcloud container clusters get-credentials multi-tenant-cluster
Default Namespaces
- default - the default namespace used when no other namespace is specified
- kube-node-lease - manages the lease objects associated with the heartbeats of each of the cluster's nodes
- kube-public - to be used for resources that may need to be visible or readable by all users throughout the whole cluster
- kube-system - used for components created by the Kubernetes system
List all namespaced resources
kubectl api-resources --namespaced=true
Creating new namespaces
kubectl create namespace team-a && \
kubectl create namespace team-b
Specify namespaces when creating resources
kubectl run app-server --image=centos --namespace=team-a -- sleep infinity && \
kubectl run app-server --image=centos --namespace=team-b -- sleep infinity
Get all pods across all namespaces
kubectl get pods -A
Set current namespace context
kubectl config set-context --current --namespace=team-a
GKE IAM Roles
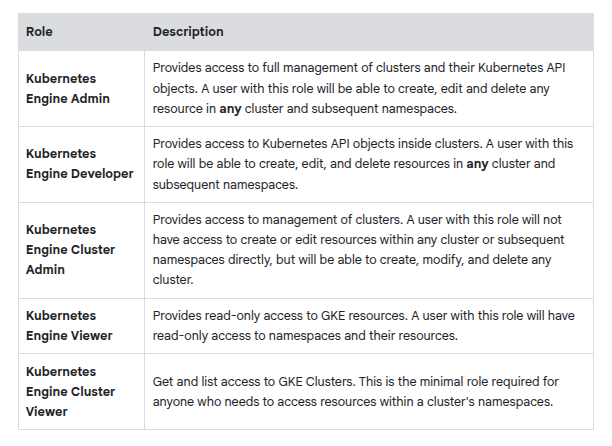
Grant cluster viewer role
gcloud projects add-iam-policy-binding ${GOOGLE_CLOUD_PROJECT} \
--member=serviceAccount:team-a-dev@${GOOGLE_CLOUD_PROJECT}.iam.gserviceaccount.com  \
--role=roles/container.clusterViewer
Create k8s roles
kubectl create role pod-reader \
--resource=pods --verb=watch --verb=get --verb=list
Sample Role yaml
apiVersion: rbac.authorization.k8s.io/v1
kind: Role
metadata:
  namespace: team-a
  name: developer
rules:
- apiGroups: [""]
  resources: ["pods", "services", "serviceaccounts"]
  verbs: ["update", "create", "delete", "get", "watch", "list"]
- apiGroups:["apps"]
  resources: ["deployments"]
  verbs: ["update", "create", "delete", "get", "watch", "list"]
Role binding between team-a-developers serviceaccount and the developer role
kubectl create rolebinding team-a-developers \
--role=developer --user=team-a-dev@${GOOGLE_CLOUD_PROJECT}.iam.gserviceaccount.com
Get service account keys to impersonate a service account
gcloud iam service-accounts keys create /tmp/key.json --iam-account team-a-dev@${GOOGLE_CLOUD_PROJECT}.iam.gserviceaccount.com
Auth using the service key you downloaded
gcloud auth activate-service-account --key-file=/tmp/key.json
Get cluster creds using the service account you just activated
export ZONE=us-east1-d
gcloud container clusters get-credentials multi-tenant-cluster --zone ${ZONE} --project ${GOOGLE_CLOUD_PROJECT}

Resource Quotas
When a cluster is shared in a multi-tenant set up, it's important to make sure that users are not able to use more than their fair share of the cluster resources. A resource quota object (ResourceQuota) will define constraints that will limit resource consumption in a namespace. A resource quota can specify a limit to object counts (pods, services, stateful sets, etc), total sum of storage resources (persistent volume claims, ephemeral storage, storage classes ), or total sum of compute resources. (cpu and memory).
Creating a quota
kubectl create quota test-quota \
--hard=count/pods=2,count/services.loadbalancers=1 --namespace=team-a

Sample declarative quota
apiVersion: v1
kind: ResourceQuota
metadata:
  name: cpu-mem-quota
  namespace: team-a
spec:
  hard:
    limits.cpu: "4"
    limits.memory: "12Gi"
    requests.cpu: "2"
    requests.memory: "8Gi"
Node machine types
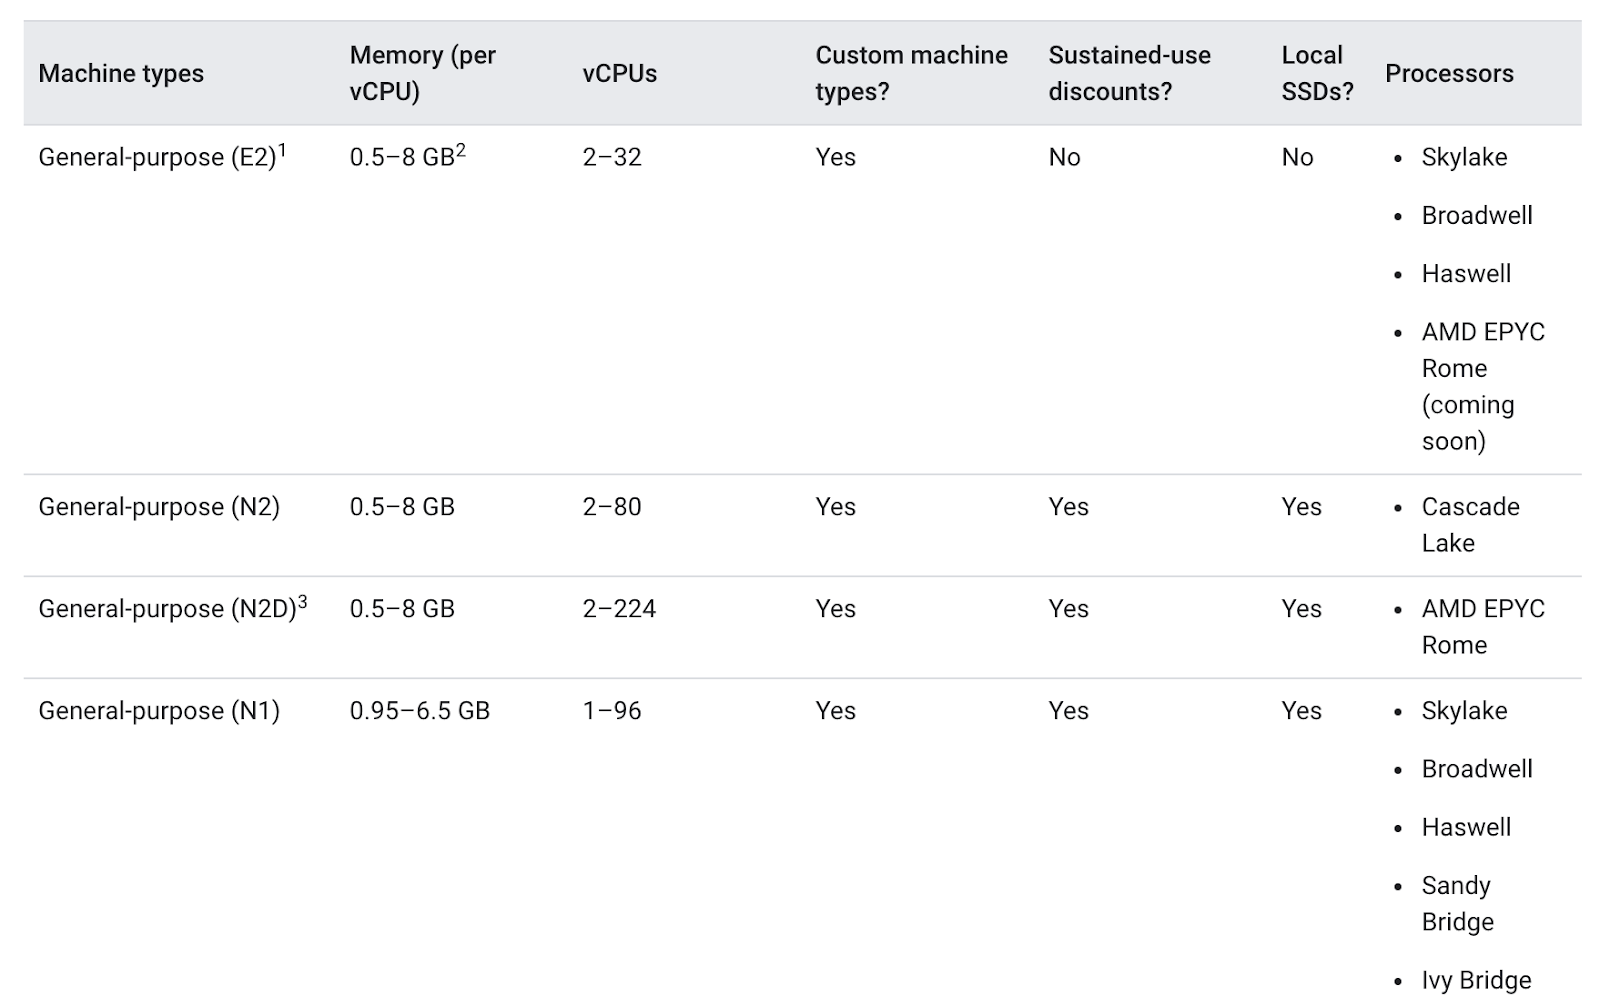
For bigger applications or deployments that need to scale heavily, it can be cheaper to stack your workloads on a few optimized machines rather than spreading them across many general purpose ones.
Scale deployments
kubectl scale deployment hello-server --replicas=2

Resize nodepool
gcloud container clusters resize hello-demo-cluster --node-pool my-node-pool --num-nodes 3 --zone us-east4-a
Modify machine type of an existing nodepool in a cluster
gcloud container node-pools create larger-pool \
  --cluster=hello-demo-cluster \
  --machine-type=e2-standard-2 \
  --num-nodes=1 \
  --zone=us-east4-a
Migrating to the new larger nodepool
- Cordon the existing node pool to prevent scheduling:
for node in $(kubectl get nodes -l cloud.google.com/gke-nodepool=my-node-pool -o=name); do
  kubectl cordon "$node";
done
- Drain the existing node pool - evict existing workloads gracefully
for node in $(kubectl get nodes -l cloud.google.com/gke-nodepool=my-node-pool -o=name); do
  kubectl drain --force --ignore-daemonsets --delete-local-data --grace-period=10 "$node";
done
- Delete the old node pool:
gcloud container node-pools delete my-node-pool --cluster hello-demo-cluster --zone us-east4-a
Multi-zone vs Multi-region clusters
Note: A multi-zonal cluster has at least one additional zone defined but only has a single replica of the control plane running in a single zone. Workloads can still run during an outage of the control plane's zone, but no configurations can be made to the cluster until the control plane is available.
A regional cluster has multiple replicas of the control plane, running in multiple zones within a given region. Nodes also run in each zone where a replica of the control plane runs. Regional clusters consume the most resources but offer the best availability.
Sample Apache-php deployment
apiVersion: apps/v1
kind: Deployment
metadata:
  name: php-apache
spec:
  selector:
    matchLabels:
      run: php-apache
  replicas: 3
  template:
    metadata:
      labels:
        run: php-apache
    spec:
      containers:
      - name: php-apache
        image: k8s.gcr.io/hpa-example
        ports:
        - containerPort: 80
        resources:
          limits:
            cpu: 500m
          requests:
            cpu: 200m
---
apiVersion: v1
kind: Service
metadata:
  name: php-apache
  labels:
    run: php-apache
spec:
  ports:
  - port: 80
  selector:
    run: php-apache
Apply Horizontal Autoscaling - Scaling by number of pods
kubectl autoscale deployment php-apache --cpu-percent=50 --min=1 --max=10
This gives us a horizontal pod autoscaler which keeps between 1 and 10 replicas of the pods in the php-apache deployment.
cpu-percent - specifies 50% as the target average CPU utilization of requested CPU over all the pods.

In this case, the autoscaler will scale the deployment down to the minimum number of pods indicated when you run the autoscale command
Vertical Autoscaling - Scaling by size of pod
Scale by changing the CPU and memory requests+limits.
Check if vertical autoscaling has been enabled at the cluster level:
gcloud container clusters describe scaling-demo | grep ^verticalPodAutoscaling -A 1
Set CPU Resource Requests for the deployment
kubectl set resources deployment hello-server --requests=cpu=450m

Vertical Pod Autoscaler Manifest Sample
apiVersion: autoscaling.k8s.io/v1
kind: VerticalPodAutoscaler
metadata:
  name: hello-server-vpa
spec:
  targetRef:
    apiVersion: "apps/v1"
    kind:       Deployment
    name:       hello-server
  updatePolicy:
    updateMode: "Off"
Uses targetRef to target the hello-server deployment.
Update policies:
- Off - the VPA generates recommends based on historical data, applied manually
- Initial - recommendations used to create new pods once but not to subsequently change their size
- Auto - pods regularly deleted and recreated to match recommendations
kubectl apply -f hello-vpa.yaml
kubectl describe vpa hello-server-vpa
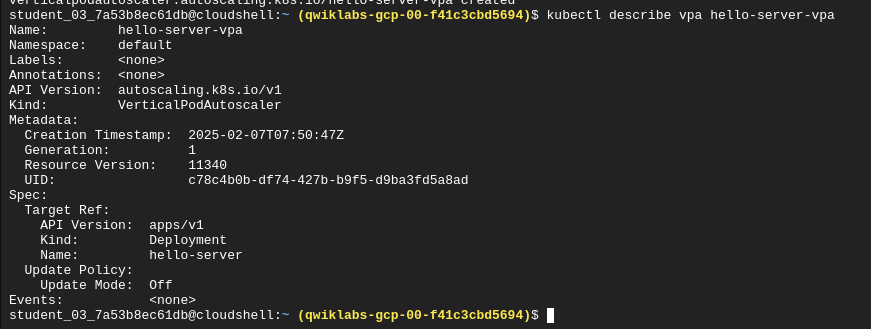
Check recommendations from the VPA post applying the autoscaler:
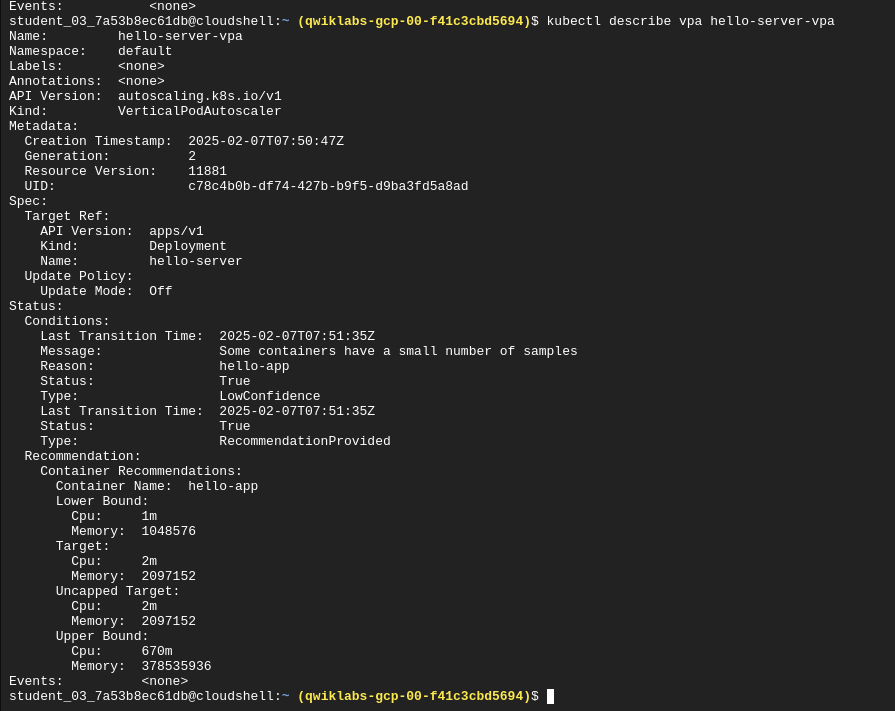
- Lower bound - if pod utilization goes below this level, the VPA will trigger a resize by deleting the pod.
- Target - the value the VPA will use when resizing the pod
- Uncapped Target - if no min or max capacity assigned to the VPA then this is the target utilization for the VPA
- Upper Bound - if pod utilization goes above this level, the VPA will trigger a resize by scaling up the pod.
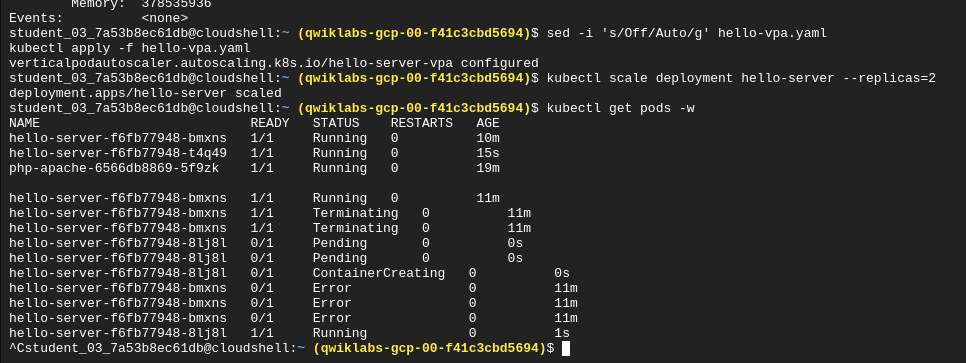
Note: If you still see a CPU request of 450m for either of the pods, manually set your CPU resource to the target with this command: kubectl set resources deployment hello-server --requests=cpu=25m Sometimes VPA in auto mode may take a long time or set inaccurate upper or lower bound values without the time to collect accurate data. In order to not lose time in the lab, using the recommendation as if it were in "Off" mode is a simple solution.
Depending on your application, it's generally safest to use VPA with the Off update policy and take the recommendations as needed in order to both optimize resource usage and maximize your cluster's availability.
Cluster Autoscaling
Designed to add or remove nodes based on demand.
Enable cluster autoscaling:
gcloud beta container clusters update scaling-demo --enable-autoscaling --min-nodes 1 --max-nodes 5
When scaling a cluster, the decision of when to remove a node is a trade-off between optimizing for utilization or the availability of resources. Removing underutilized nodes improves cluster utilization, but new workloads might have to wait for resources to be provisioned again before they can run.
- Balanced: The default profile.
- Optimize-utilization: Prioritize optimizing utilization over keeping spare resources in the cluster. When selected, the cluster autoscaler scales down the cluster more aggressively. It can remove more nodes, and remove nodes faster. This profile has been optimized for use with batch workloads that are not sensitive to start-up latency.
Switching autoscaling strategies
gcloud beta container clusters update scaling-demo --autoscaling-profile optimize-utilization
Protecting Monitoring and Core K8s Deployments from autoscaler
Most system pods prevent the autoscaler from taking them down.
You can apply a pod disruption budget to kube-system pods to allow the cluster autoscaler to safely reschedule them onto another node. In this budget you specify the max-unavailable and min-available a deployment should have:
kubectl create poddisruptionbudget kube-dns-pdb --namespace=kube-system --selector k8s-app=kube-dns --max-unavailable 1
kubectl create poddisruptionbudget prometheus-pdb --namespace=kube-system --selector k8s-app=prometheus-to-sd --max-unavailable 1
kubectl create poddisruptionbudget kube-proxy-pdb --namespace=kube-system --selector component=kube-proxy --max-unavailable 1
kubectl create poddisruptionbudget metrics-agent-pdb --namespace=kube-system --selector k8s-app=gke-metrics-agent --max-unavailable 1
kubectl create poddisruptionbudget metrics-server-pdb --namespace=kube-system --selector k8s-app=metrics-server --max-unavailable 1
kubectl create poddisruptionbudget fluentd-pdb --namespace=kube-system --selector k8s-app=fluentd-gke --max-unavailable 1
kubectl create poddisruptionbudget backend-pdb --namespace=kube-system --selector k8s-app=glbc --max-unavailable 1
kubectl create poddisruptionbudget kube-dns-autoscaler-pdb --namespace=kube-system --selector k8s-app=kube-dns-autoscaler --max-unavailable 1
kubectl create poddisruptionbudget stackdriver-pdb --namespace=kube-system --selector app=stackdriver-metadata-agent --max-unavailable 1
kubectl create poddisruptionbudget event-pdb --namespace=kube-system --selector k8s-app=event-exporter --max-unavailable 1
This disruption budget means only 1 pod is unavailable at a time which allows kube-system pods to be rescheduled by the autoscaler.
Node autoprovisioning
Adds new nodepools which are sized for demand.
Enable autoprovisioning:
gcloud container clusters update scaling-demo \
    --enable-autoprovisioning \
    --min-cpu 1 \
    --min-memory 2 \
    --max-cpu 45 \
    --max-memory 160
We are specifying a min and max for CPU and memory which applies across the entire cluster. This gives the autoprovisioner an understanding of what the max and min resources are like when creating custom nodepools.
Pause Pods
Sample Pause Pod YAML
---
apiVersion: scheduling.k8s.io/v1
kind: PriorityClass
metadata:
  name: overprovisioning
value: -1
globalDefault: false
description: "Priority class used by overprovisioning."
---
apiVersion: apps/v1
kind: Deployment
metadata:
  name: overprovisioning
  namespace: kube-system
spec:
  replicas: 1
  selector:
    matchLabels:
      run: overprovisioning
  template:
    metadata:
      labels:
        run: overprovisioning
    spec:
      priorityClassName: overprovisioning
      containers:
      - name: reserve-resources
        image: k8s.gcr.io/pause
        resources:
          requests:
            cpu: 1
            memory: 4Gi
Apply the pause pod overprovisioning:
kubectl apply -f pause-pod.yaml
Workload Optimization
Create a cluster with the --enable-ip-alias flag to use alias IPs for pods (required for container native LB)
gcloud container clusters create test-cluster --num-nodes=3 --enable-ip-alias
Container native LB
Container native lb for hitting pods directly from the LB. Otherwise we have to send lb traffic to an instance group which then uses iptables to map out to pods:
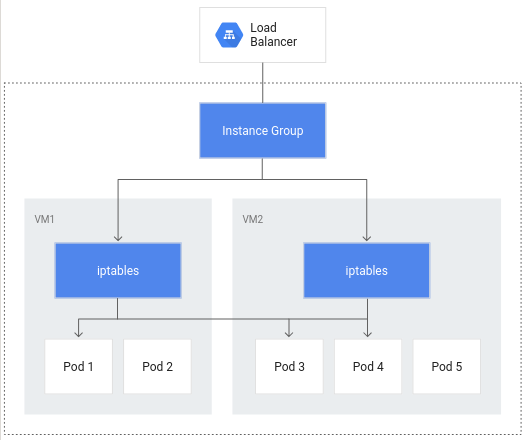
In addition to more efficient routing, container-native load balancing results in substantially reduced network utilization,improved performance, even distribution of traffic across Pods, and application-level health checks.
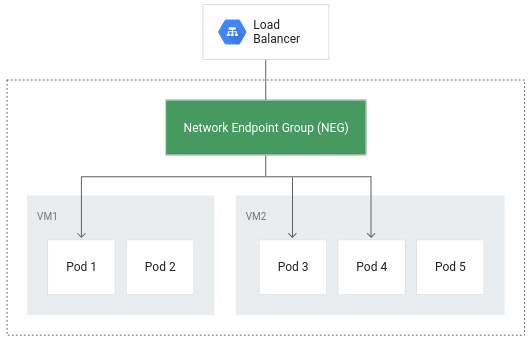
Sample manifest to create a clusterIP service:
apiVersion: v1
kind: Service
metadata:
  name: gb-frontend-svc
  annotations:
    cloud.google.com/neg: '{"ingress": true}'
spec:
  type: ClusterIP
  selector:
    app: gb-frontend
  ports:
  - port: 80
    protocol: TCP
    targetPort: 80
The annotation for cloud.google.com/neg is used to enable container native lb when an ingress is created.
Sample application ingress:
apiVersion: networking.k8s.io/v1
kind: Ingress
metadata:
  name: gb-frontend-ingress
spec:
  defaultBackend:
    service:
      name: gb-frontend-svc
      port:
        number: 80
The ingress creation creates an LB and a NEG (network endpoint group) in each zone which the cluster runs.
The LB has a backend service running that defines how the cloud lb distributes traffic, it also has an associated health check.
Get the name of the backend service:
BACKEND_SERVICE=$(gcloud compute backend-services list | grep NAME | cut -d ' ' -f2)
Get the health status for the service:
gcloud compute backend-services get-health $BACKEND_SERVICE --global
Get the ingress ip of the app:
kubectl get ingress gb-frontend-ingress

Locust install
gsutil -m cp -r gs://spls/gsp769/locust-image .
gcloud builds submit \
    --tag gcr.io/${GOOGLE_CLOUD_PROJECT}/locust-tasks:latest locust-image
    gcloud container images list
Locust consists of a main and a number of worker machines to generate load.
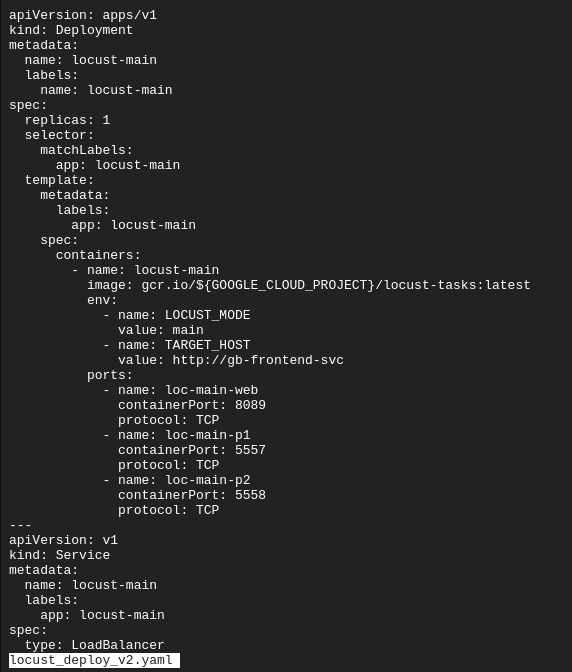
Copy and apply the manifest will create a single-pod deployment for the main and a 5-replica deployment for the workers:
gsutil cp gs://spls/gsp769/locust_deploy_v2.yaml .
sed 's/${GOOGLE_CLOUD_PROJECT}/'$GOOGLE_CLOUD_PROJECT'/g' locust_deploy_v2.yaml | kubectl apply -f -
The locust_deploy_v2.yaml has the target host defined:
Get the service's external IP:
kubectl get service locust-main
You use locust to see how your cpu and memory requirements change with number of swarms and hatch rate - you can see if you can reduce your memory or cpu requests, whether an autoscaler would kick in based on cpu usage etc.
Liveness Probe
Create a pod with a liveness probe based on the existance of a file every 10 seconds:
apiVersion: v1
kind: Pod
metadata:
  labels:
    demo: liveness-probe
  name: liveness-demo-pod
spec:
  containers:
  - name: liveness-demo-pod
    image: centos
    args:
    - /bin/sh
    - -c
    - touch /tmp/alive; sleep infinity
    livenessProbe:
      exec:
        command:
        - cat
        - /tmp/alive
      initialDelaySeconds: 5
      periodSeconds: 10
Note: Pods can also be configured to include a startupProbe which indicates whether the application within the container is started. If a startupProbe is present, no other probes will perform until it returns a Success state. This is recommended for applications that may have variable start-up times in order to avoid interruptions from a liveness probe.
Delete the tmp/alive file and check the pod logs:


Note: The example in this lab uses a command probe for its livenessProbe that depends on the exit code of a specified command. In addition to a command probe, a livenessProbe could be configured as an HTTP probe that will depend on HTTP response, or a TCP probe that will depend on whether a TCP connection can be made on a specific port.
Readiness Probe
A readiness probe is used to determine when a pod and its containers are ready to begin receiving traffic.
Single pod manifest with web server and load balancer with periodic readiness probe based on a command:
apiVersion: v1
kind: Pod
metadata:
  labels:
    demo: readiness-probe
  name: readiness-demo-pod
spec:
  containers:
  - name: readiness-demo-pod
    image: nginx
    ports:
    - containerPort: 80
    readinessProbe:
      exec:
        command:
        - cat
        - /tmp/healthz
      initialDelaySeconds: 5
      periodSeconds: 5
---
apiVersion: v1
kind: Service
metadata:
  name: readiness-demo-svc
  labels:
    demo: readiness-probe
spec:
  type: LoadBalancer
  ports:
    - port: 80
      targetPort: 80
      protocol: TCP
  selector:
    demo: readiness-probe
Unlike the liveness probe, an unhealthy readiness probe does not trigger the pod to restart.
Setting meaningful readiness probes for your application containers ensures that pods are only receiving traffic when they are ready to do so. An example of a meaningful readiness probe is checking to see whether a cache your application relies on is loaded at startup.
Pod Disruption Budget
PodDisruptionBudget is a Kubernetes resource that limits the number of pods of a replicated application that can be down simultaneously due to voluntary disruptions.
Cordon and evict pods
for node in $(kubectl get nodes -l cloud.google.com/gke-nodepool=default-pool -o=name); do
  kubectl drain --force --ignore-daemonsets --grace-period=10 "$node";
done
Uncordon nodes
for node in $(kubectl get nodes -l cloud.google.com/gke-nodepool=default-pool -o=name); do
  kubectl uncordon "$node";
done
Create pod disruption budget from cli
kubectl create poddisruptionbudget gb-pdb --selector run=gb-frontend --min-available 4
Deploying apps on k8s Lab Notes
Create an nginix depoyment
kubectl create deployment nginx --image=nginx:1.10.0
Reauthenticate with cluster
gcloud container clusters get-credentials io
Set compute zone
gcloud config set compute/zone us-central1-c
Create a cluster
gcloud container clusters create io --zone us-central1-c
Create an nginx deployment
kubectl create deployment nginx --image=nginx:1.10.0
Expose the nginx deployment behind an LB
kubectl expose deployment nginx --port 80 --type LoadBalancer
Get info about a pod
kubectl describe pods monolith
Port forwarding
Pods have a private IP, can't be reached from outside the cluster.
kubectl port-forward monolith 10080:80
This forwards from the monolith:80 to localhost:10080
Saving a token from curl to an env var
TOKEN=$(curl http://127.0.0.1:10080/login -u user|jq -r '.token')
View pod logs
kubectl logs monolith
Get an interactive shell inside the monolith pod
kubectl exec monolith --stdin --tty -c monolith -- /bin/sh
Creating a secure pod with tls certs from file
kubectl create secret generic tls-certs --from-file tls/
kubectl create configmap nginx-proxy-conf --from-file nginx/proxy.conf
kubectl create -f pods/secure-monolith.yaml
Create a service to expose the secure pod
kind: Service
apiVersion: v1
metadata:
  name: "monolith"
spec:
  selector:
    app: "monolith"
    secure: "enabled"
  ports:
    - protocol: "TCP"
      port: 443
      targetPort: 443
      nodePort: 31000
  type: NodePort
The selector is used to find and expose pods labelled with app:monolith and secure:enabled
Each node in the service exposes a nodeport - for forwarding external traffic coming in on 31000 to nginx on port 443
Add firewall rules to allow traffic to the monolith service on the nodeport
gcloud compute firewall-rules create allow-monolith-nodeport --allow=tcp:31000
Get pods by label
kubectl get pods -l "app=monolith"
Add a label to an existing pod
kubectl label pods secure-monolith 'secure=enabled'
gcloud artifacts repositories create valkyrie-repository --repository-format=docker --location=us-east4 --description="Docker repository"
gcloud builds submit --tag us-east4-docker.pkg.dev/${DEVSHELL_PROJECT_ID}/valkyrie-repository/valkyrie-prod:v0.0.3
